Friday, 27 February 2015

ToMB 2015 Month 1b - Advice Pig says hello

I was going to start this off by writing some blurb about whether McMourning is actually a Coroner, or whether his job is better described as a Forensic Pathologist. But you don't care about that, do you? No, you want to see pictures! 

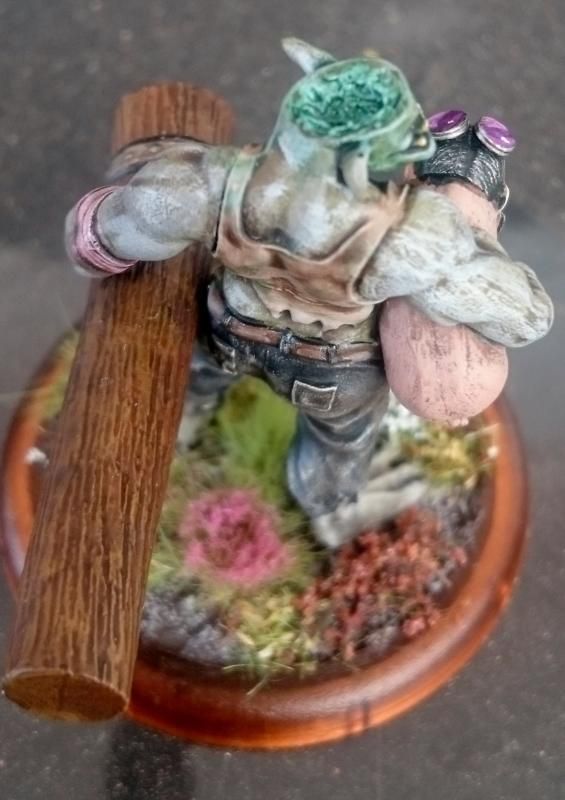
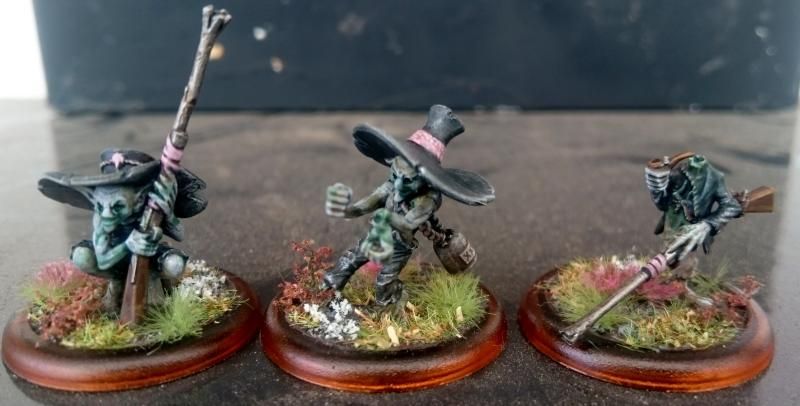
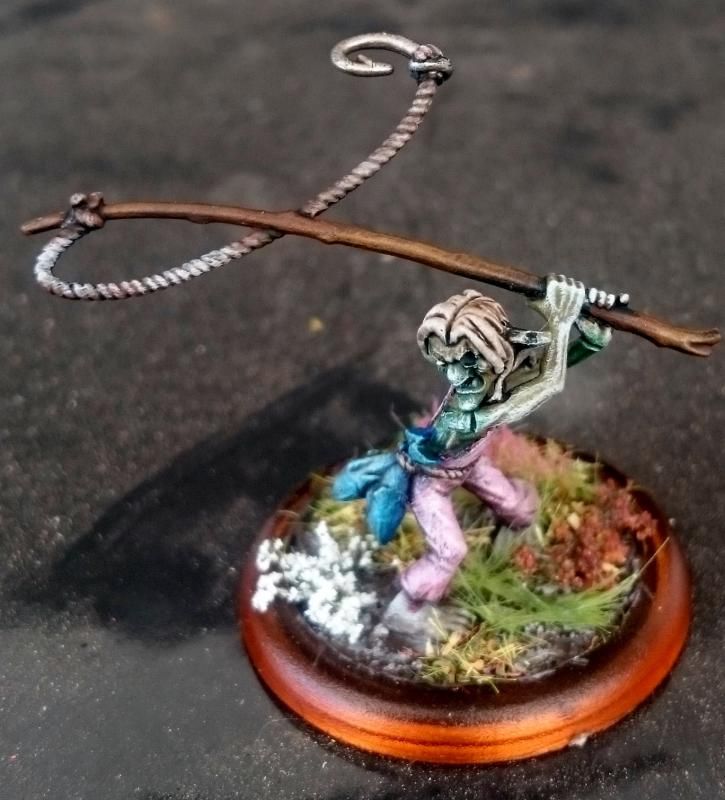
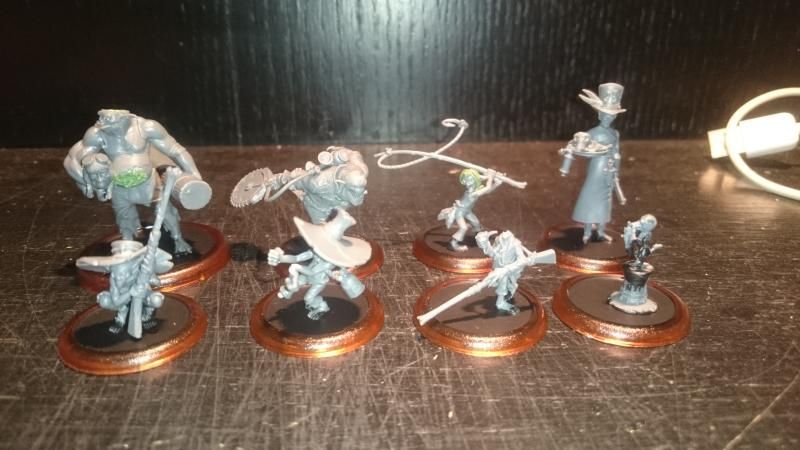
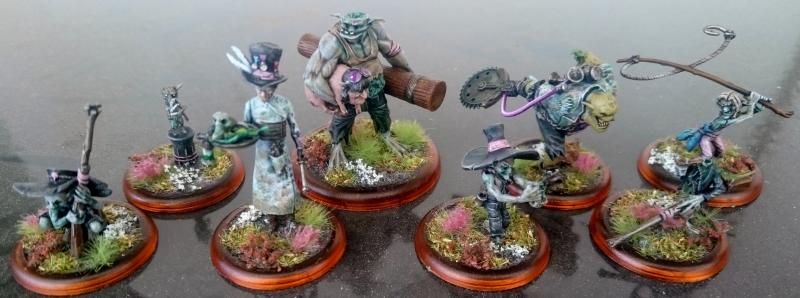
So here it is, my first batch of models for the Tale of Malifaux Bloggers! Needless to say I'm pretty happy with how they turned out. The whole thing involved me branching out a little and learning some alternative paint schemes, namely undead gremlin flesh and how best to do gremlin blood. I also went for some slightly different basing with these guys as well - having replaced my usual green flock with a combination of static grass and tea leaves.

Anyway, enough chatter. Here are the models;


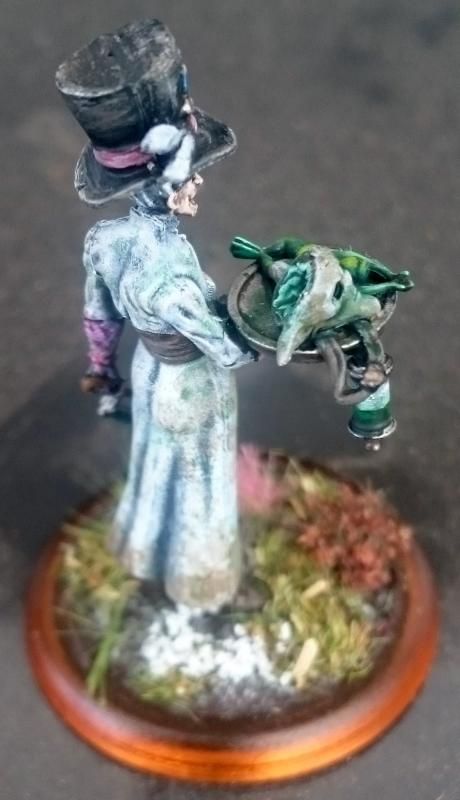
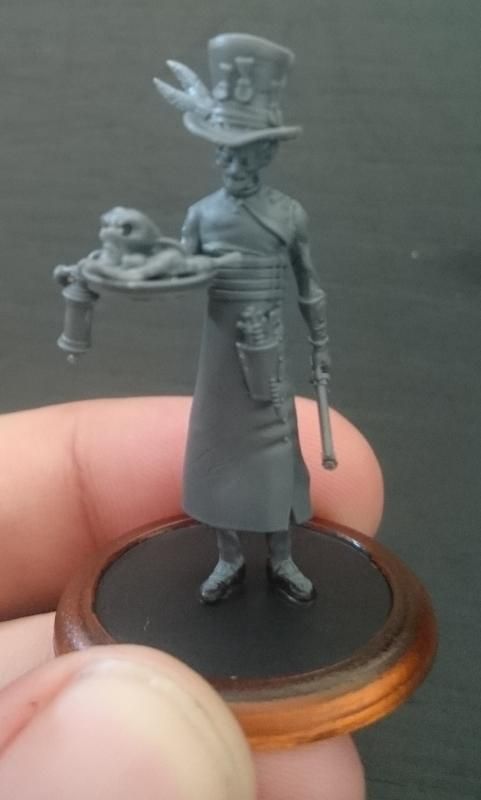
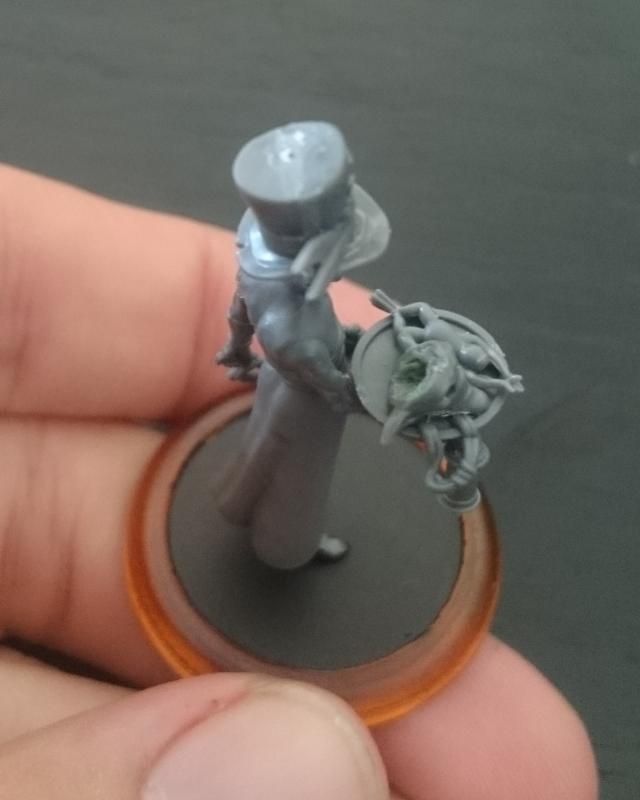
Dr Douglas McMourning, Bayou Doctor

It was perhaps inevitable that the good Doctor's double life as a Guild Forensic Pathologist/Resurrectionist would come to light. With his secret labs burnt to the ground and the guild hot on his tale, McMourning made his escape to one of the few places the long arm of the law would not find him - the Bayou.


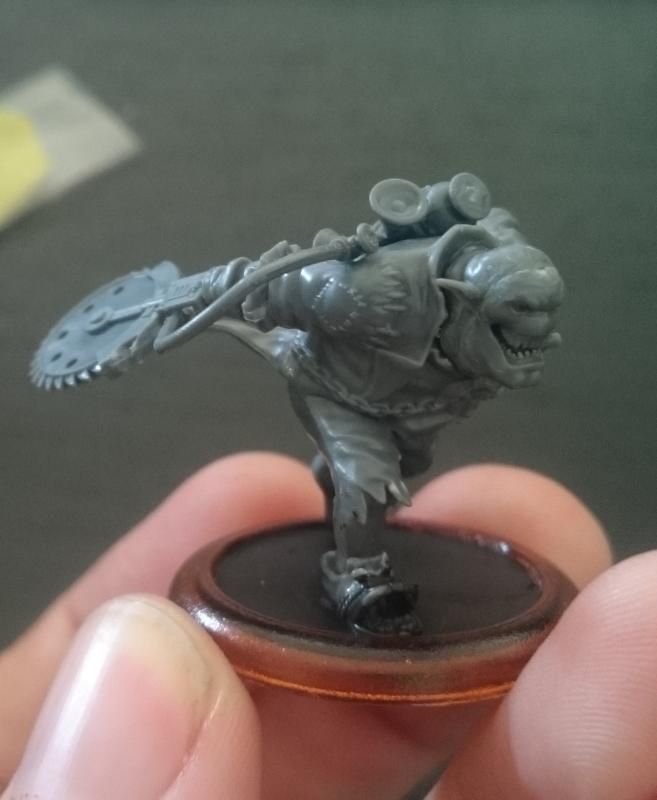
Sebastian II

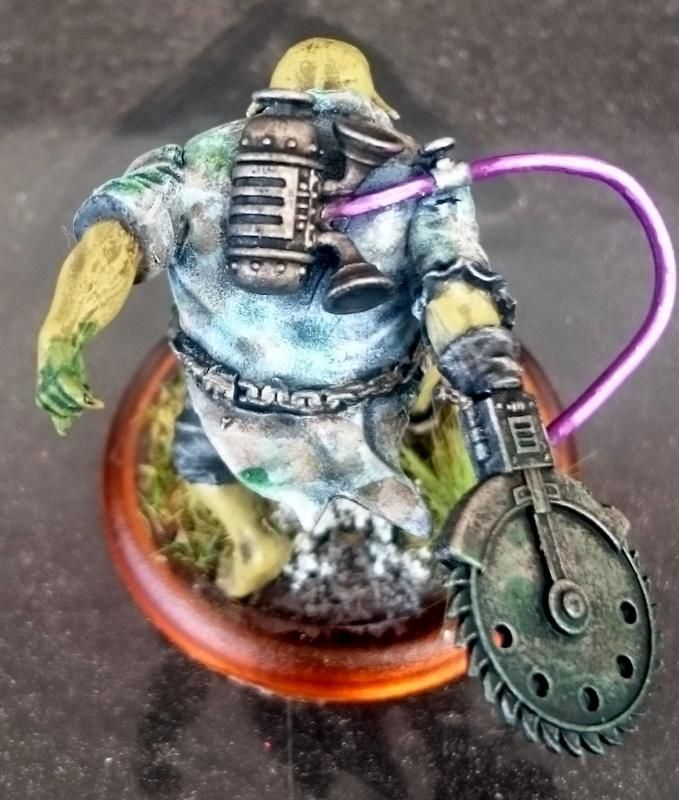
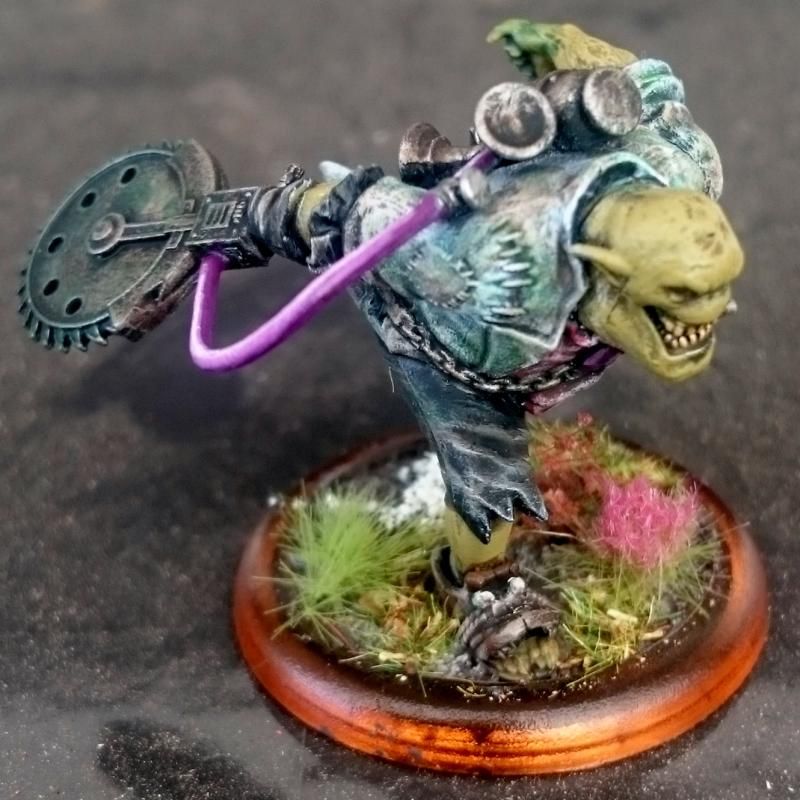
The arrival of a human, self-styled doctor was a cause for great concern among the local gremlin tribes. Initial attempts to eat him proved more difficult than anticipated so it didn't take long for most gremlins to accept their new neighbor, albeit with a healthy dose of fear. 

Of course as is typical of gremlins, a number of them took to admiring and eventually emulating their new Bayou Doctor. With his former lab assistant out of action McMourning was all to happy to accept new apprentices. Almost all inevitably became his test subjects, although one particularly bright fellow proved more useful alive than dead. Though he almost definitely had a name of his own, McMourning either never remembered it or was incapable of realising the gremlin was not his lab assistant from before. Nowadays, almost all the local gremlins have come to accept his new name - Sebastian. 


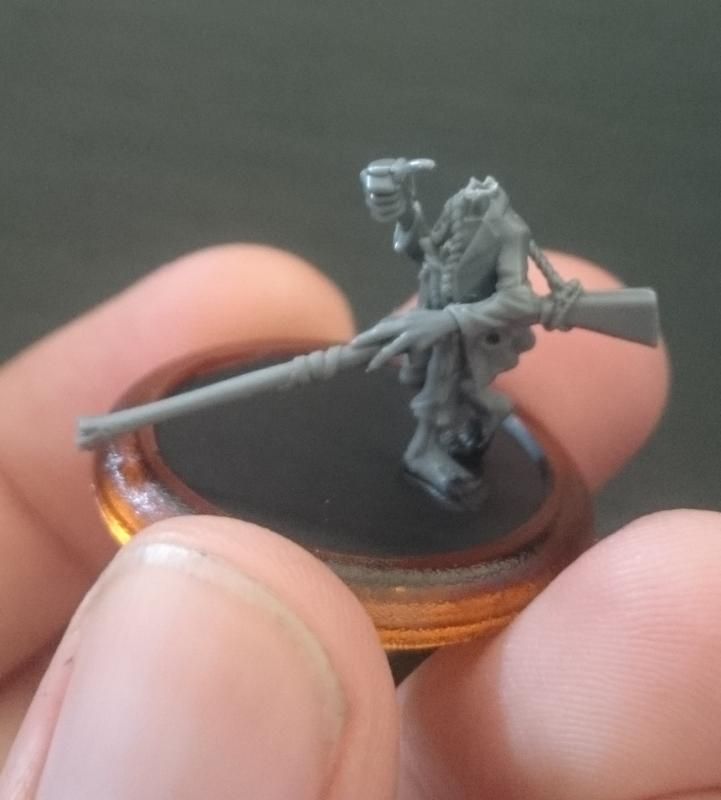
The Student of Sinew (with Advice Pig)

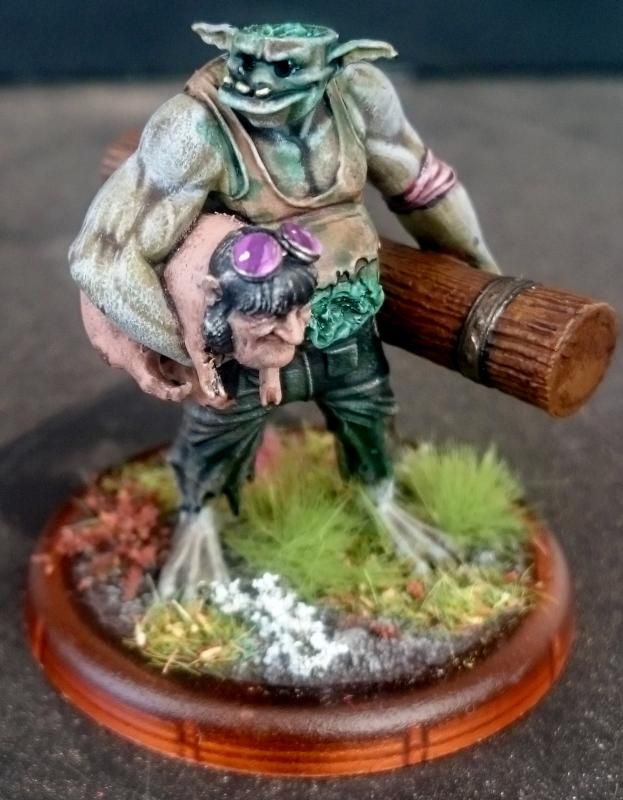
So what happened to the original Sebastian? Well he was somewhat less fortunate during his master's escape from the guild, and by the time they'd eluded capture Sebastian was left without the use of his...well... everything. Fortunately he was in the company of the self-described best surgeon this side of the Breach. So with a replacement part from the local fauna and some impressive needlework, Sebastian I's life was saved! 

McMourning has since moved on with his new lab assistant. So instead, Sebastian I has become the constant companion and teacher for one of the good Doctor's first test subjects - the very gremlin who first tried to eat McMourning. His undead "student" has proven quite receptive to the directions he gives and has become a lethal addition to McMourning's personal army. Sebastian I refuses to talk to McMourning, despite nevertheless following orders. However McMourning himself seems to have completely forgotten Sebastian I's origins and has now given him a new name - Advice Pig.


The Bayou Autopsies

If nothing else, moving his lab to the Bayou has given McMourning a near inexhaustible supply of bodies. Initially the gremlins had proven unwilling to move within reach of him, resulting in the Bayou Doctor spending almost as much time capturing the Gremlins as he did experimenting on them. However as his experiments proved fruitful and his reputation grew, he found himself with both a steady stream of willing "assistants", and a growing army of undead minions to capture the less willing participants for him. 


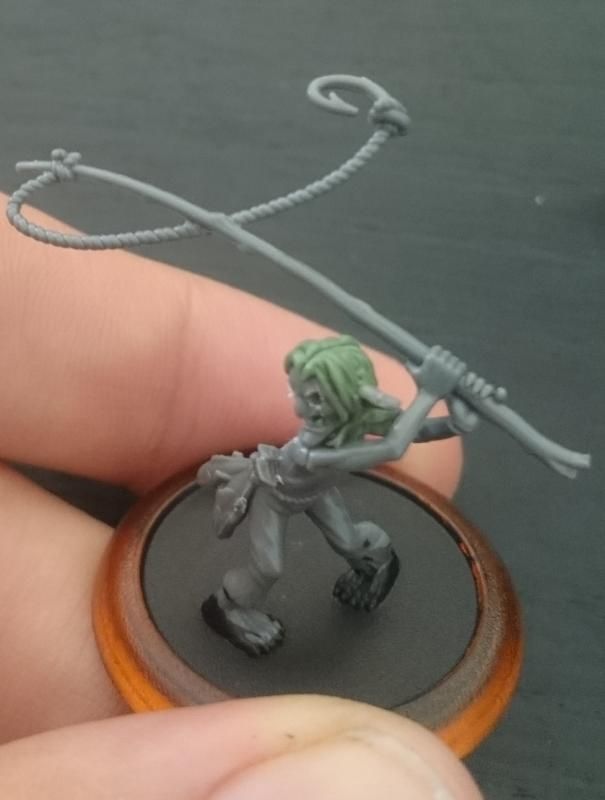
The Bayou Belle

When McMourning completed his work on the Bayou Belle he'd thought nothing more of it than any of his other creations. Somehow though, this particular subject retained one skill it was almost legendary for during it's pre-undead existance - fishing. It's skill with the rod has proven extremely useful to McMournings expeditions to acquire more test subjects, and has been repsonsible for luring in more than a few unwilling targets. 


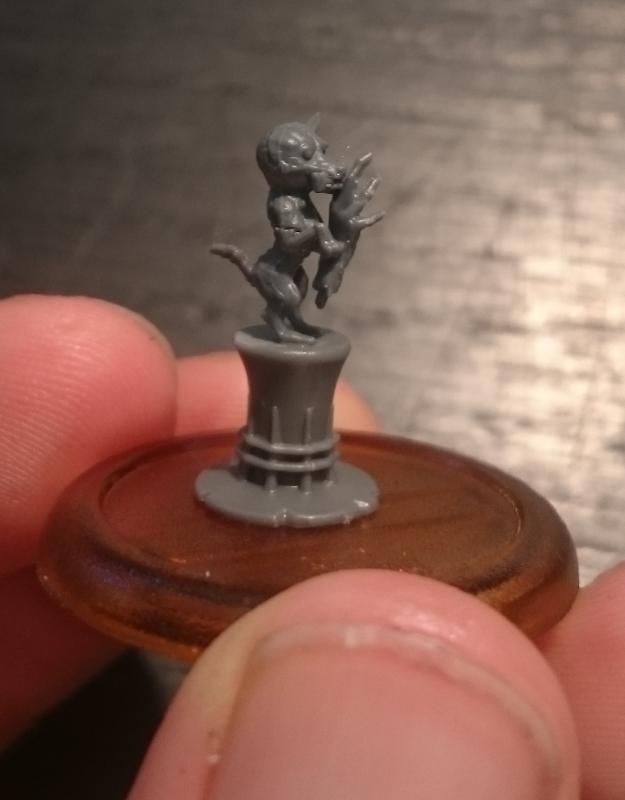
The Zombie Chihuahua
It broke McMourning's heart to leave his first creation, the Zombie Chihuahua, behind when he made his hasty escape into the Bayou. For weeks he assumed the tiny dog had been incinerated along with all the rest of his beloved creations. So it was with some surprise that McMourning found him at the door of his new lab, tail wagging excitedly and gripping the hand of some hapless gremlin in his teeth.


One month down, 3 more to go...

So with Month 1 finished I suppose the hardest part is over - I've painted up a 35SS crew and worked out what techniques I'll be using to get the effects I wanted. I've yet to play a game with these guys (hopefully I'll fix that in the weeks to come) but I know what I want to add next - flesh constructs!

Unfortunately I've also hit a bit of a snag with my Flesh Construct plans. The standard flesh construct is a Ht 2, 40mm based model. However the Warpig I was planning to proxy it with is a Ht 3, 50mm based model. Wyrd has never been that consistent about the Ht of their models (the flesh construct is as tall as the new plastic warpig), but it still doesn't sit right with me. Besides, if I use something else for my Flesh construct then I could use the Warpig as a base for my Rogue Necromancy! So I'm wondering what I could use for a flesh construct instead? If anyone has any ideas on that front, I'd like to hear them! 

Until next time,

Adrian

Saturday, 7 February 2015

ToMB 2015 Month 1 - The Bayou Doctor is born

Welcome back to my Tale of Malifaux Bloggers!
                    
I last left you with an exciting (kinda...) cliffhanger – having told you I’m starting McMourning, my first purchase was to be… So’mer’s starter box?!?! I guess it’s time to explain the method to my madness.

Like I alluded in my last ToMB article I really wanted to be building a crew to a unique and interesting theme. I had already committed to Ressers for the year and considering the my dissatisfaction with some of my Resser crew models (well, McMourning and Yan Lo), I really needed something that I could both justify building to replace my existing crew, and would keep me interested for the length of the challenge.

I can’t remember exactly how it happened, but somehow I came across my unopened plastic Born on the Bayou box and linked it up with the idea of building a McMourning crew from it.  It didn’t take me too long to nut out potential in-theme proxies that would work for the crew and before I knew it, I had a plan for the ToMB! I am to build a Bayou-themed McMourning crew, complete with conversions across both factions to create something, well, kind of bizarre I guess.  

So the theme behind the crew is simple enough. McMourning is finally exposed as a dirty Resser and has to escape quick-smart to the one place he believes the Guild won’t follow – the Bayou. Forced to start his work afresh, he “convinces” the local gremlin tribes to work for him, both as his assistants and his test subjects (they probably don’t know the difference). Stuff happens, hijinks occur and the stage is set for the newest Bayou Doc to terrorise the locals with his undead creations from the most readily available resources - gremlins & pigs. :D


Month 1 Purchases

For my first month of purchases I needed both McMourning’s and So’mer’s starter boxes. With only £40 to spend that would put me way over my limit, so I decided to reduce the cost by “selling off" the parts of McMourning’s box I didn’t need. I’ve put the sell price at 2/3rds what it would cost retail, mainly because that’s always been my rule of thumb when buying or selling models second hand.

I was originally going to convert the monthly allowance to Australian dollars (ie. ~ AU$77 for Month 1) and work out purchases according to a local retailer called the Combat Company. But as it turns out, the Australian online retailers regularly discount their Malifaux to what their cost would be if the Australian dollar was on parity with the US currency (it’s not). The end result meant I would have gotten a massive discount on my purchases compared to ToMB participants in the UK and US. It felt pretty unfair - it translated to about an extra US$18 just for the first month! So instead I’m calculating my allowance in £UK and through the UK website Element Games. This way I still get a discount, but not a ridiculous one. ;)

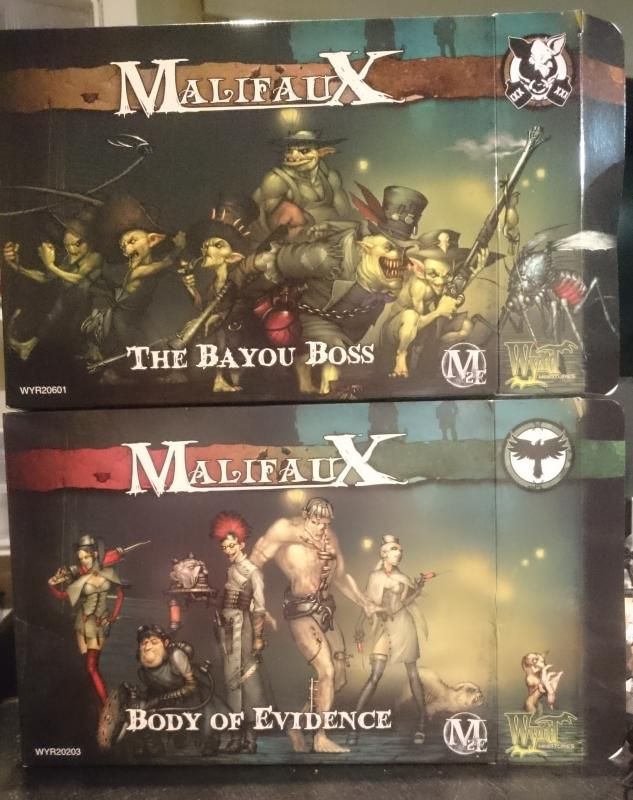
Anyway, enough of the boring details, here’s my purchases for Month 1;

The Bayou Boss:         £25.49
Body of Evidence:            £25.50
Sell 1x Canine Remains: -£2.26
Sell 2x Nurses:                   -£5.67
Sell Flesh Construct:        -£5.67
TOTAL for Month 1:        £37.39

Left over for next month: £2.61

So with the models purchased it was time to assemble! I’m using all the models from my purchases (minus the ones I “sold”, of course), with one exception – the Skeeters. I have plans for them, but won’t be able to enact on those plans until later on in the challenge. So for now I’m putting them aside. At the time of writing this I’ve now assembled everything for this month, so here’s what I’ve got;


McMourning

If Dr Doug is going to set up shop in the Bayou then at the absolute least, he needs a hat. Fortunately the Bayou Box comes with quite a few hats that are easily separated from it’s owners. Being the flashiest by far, So’mers hat was the one I decided on and with a bit of a haircut, managed to fit onto McMourning’s head with minimal trouble.

The rest of McMourning was more or less unchanged. I was thinking of adding some of the spare liquor bottles to McMourning’s tray instead of the usual zombie head, but instead went for the more Bayou-suitable frog & hollowed out gremlin head.


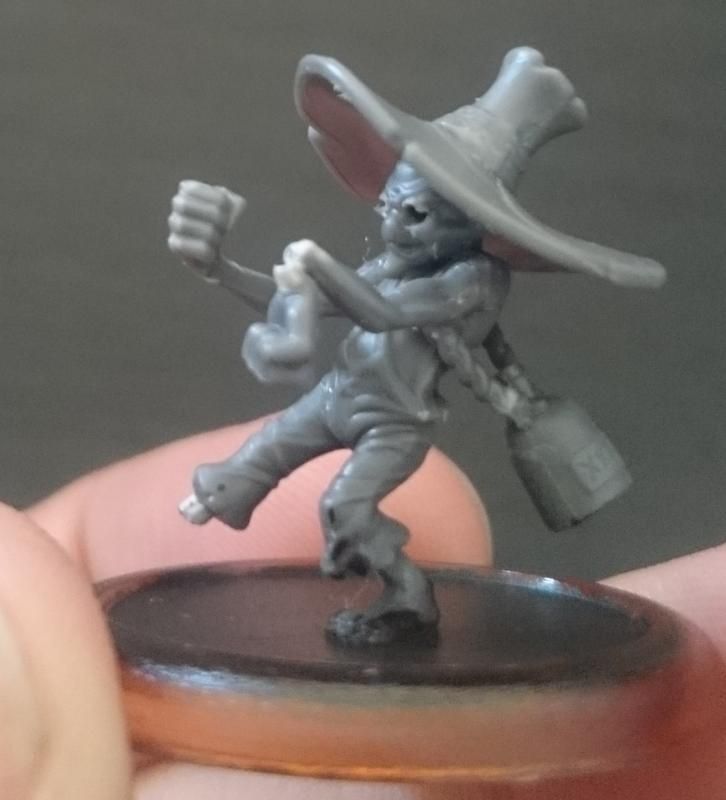
Sebastian II

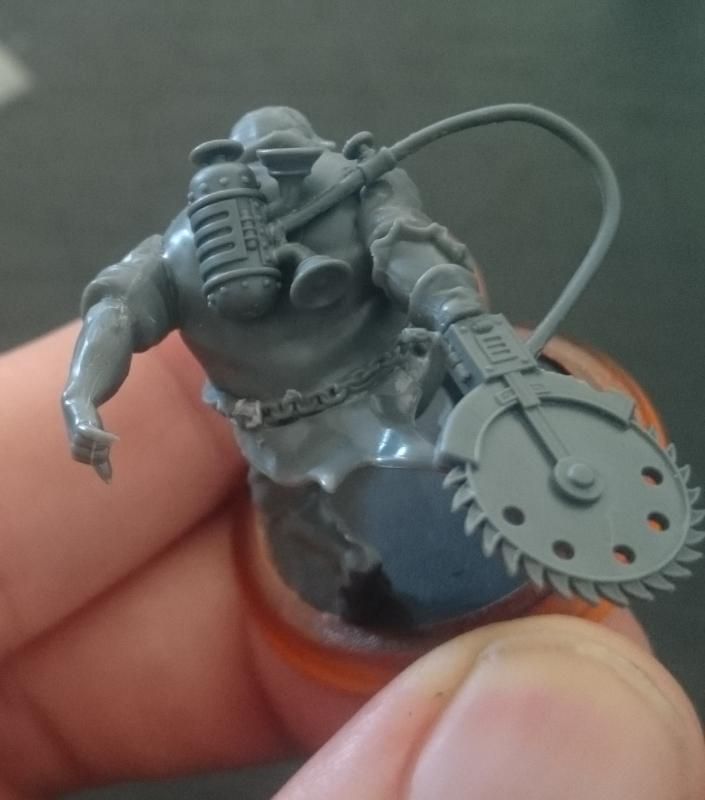
So’mer converted into Sebastian II so easily that I’m starting to think that this must have been his true purpose in life. Seb’s saw, back pack and even the tubing fit onto So’mer with a minimum of fuss – at worst I shaved down some pegs so they’d fit right, pinned the saw onto So’mers arm and drilled two holes for the tubing to glue into. The final product even looks scarily like Sebastian, or at least how you’d expect a Gremlin version of him to look.


My only gripe is with how ill-fitting some of So’mers regular pieces where during assembly. More that a few required a bit of converting, but the worst offender was the chain around the left side of his waist (pictured above). It required both shaving down and a good chunk of modelling putty to fit properly.  Overall though, this is the model I’m most proud of thus far.


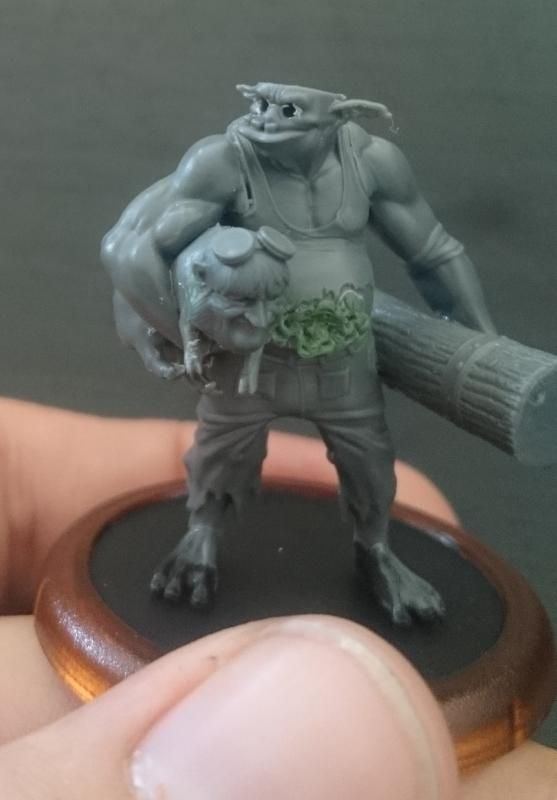
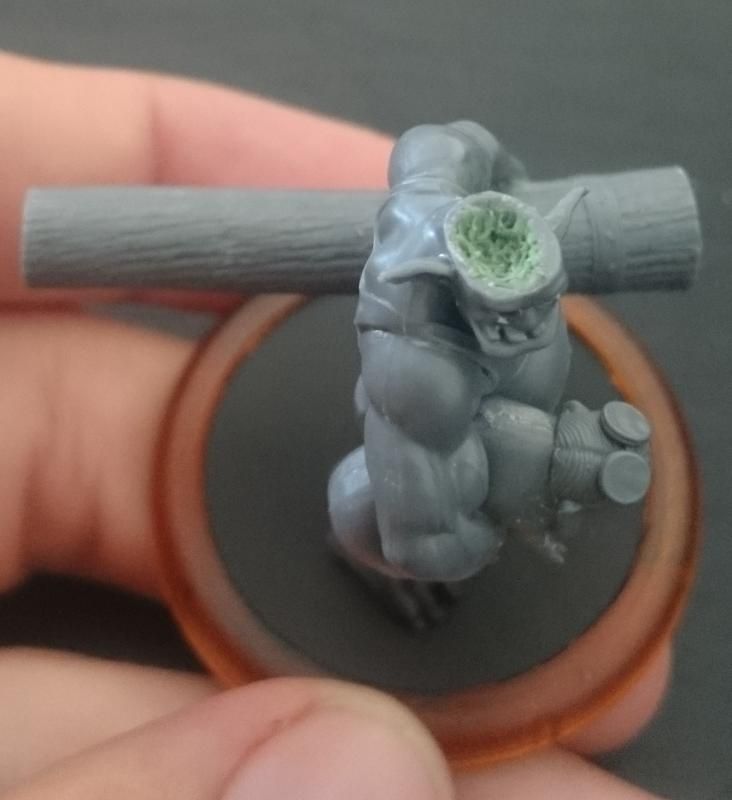
Flesh Construct/Student of Sinew (with Advice Pig)

Before writing this up I posted a pic of this model on Facebook as a sort of preview. While the feedback was positive (always encouraging!) I was really surprised by how freaked out some people were by the model! I can only assume it’s because I’ve put Sebastians head on the piglet (henceforth known as Advice Pig), which I can’t really fault people for. Advice Pig was actually a last minute conversion when I realised Seb’s head was about as large as the piglets. It was too good to resist, so Undead Lenny has a helpful Advice Pig to tell him what to hit.

I originally planned to use the model as a Student of Sinew, but at least while I’m lacking my planned models for Flesh Constructs (Warpigs), Lenny & Advice Pig will happily sub in as a Flesh Construct


“Bayou” Autopsies

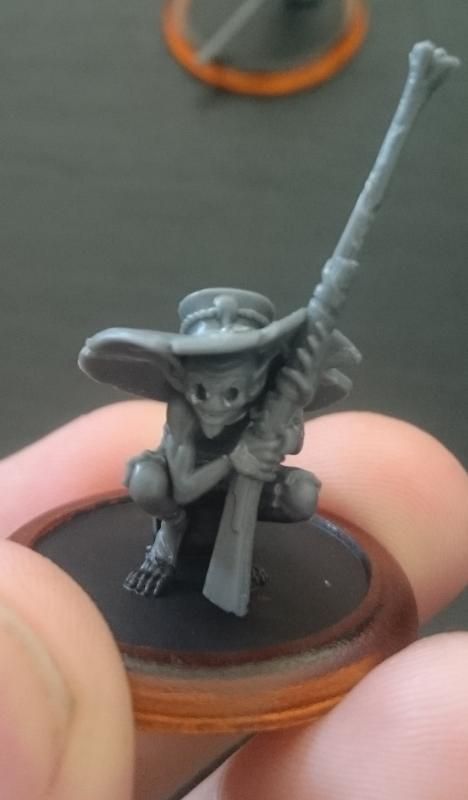
With the muscle sorted, Bayou McMourning needed some numbers to round out his starting crew. The Bayou Gremlins don’t really seem to fit as Canine Remains. But with their crappy guns, poor hygiene and fragile physique, they’re near-perfect proxies for Guild Autopsies!


The conversions for these guys were pretty simple. As is becoming standard for undead models in this crew I drilled out the eyes and carved in the odd cut to ensure they didn’t look TOO pristine to be undead minions. Pipe Gremlin was looking a little too sophisticated, so his head had to go. As for fighting Gremlin, severing a few limbs gave me a look I was satisfied with.


Rotten (fish) Belle

Originally intended for use as a 4th Guild Autopsy, this Gremlin instead became a Rotten Belle once I realised s/he could literally use that fishing rod to Lure models in. ;) Her(?) hair took a bit of time, but for better or worse it’s probably my greatest ever achievement with modelling putty. :P


Chihuahua

I wasn’t initially planning to use the original Chihuahua model for this crew. The sculpt itself is a pain to build (4 parts…4 PARTS?!?!) and I thought a puppet piglet would fit better into the crew. But being on a budget, it seemed like a waste not to use a model I paid good money for. Besides, the puppet piglet might be mistaken for a canine remains (who will be proxied using undead pigs). In any case, now that he’s standing on a gremlin hat I think he’ll fit in with the rest of the crew just fine. :)


The Future

If you know anything about how Resser McMourning works, you’ll probably realise that I’m running short on a few of his “essential” minions. Mainly Flesh Constructs and Canine remains but also the likes of Rafkin, Nurses and probably some other stuff too! I’m planning to fill those holes in subsequent months, of course, but they’ll need to be in theme. So at least for the moment, here’s what I’m thinking;

Canine Remains: Piglets (modelled/painted as undead)

Flesh Constructs: Warpigs (as above, plus mounted on a 40mm base)

Rafkin: Gremlin Taxidermist (I just hope the model comes out soon!)

Nurse: Gremlinette (Ltd ed model so while I have one, it’s not ideal)

Necropunks: Skeeters (converted somehow…I’m still very sketchy on this)

So as above I’m not entirely happy with the options for the Nurse and Necropunks. I’d also like to find something suitable for a Rogue Necromancy, Lawyer and maybe the Shikome, but the jury is still out on those as well. Of course if you have any suggestions, I’d love to hear them!

Anyway, that’s it for now. All in all I now have 8 models to undercoat and paint for the challenge, totalling 34SS without upgrades (assuming my math isn’t off). So hopefully I’ll have something to show you before the month is out!

Until next time,


Adrian

Thursday, 29 January 2015

Year of the Crow - Seamus


So hey, look at this, the The Year of the Crow and my focus on Ressers has officially begun! The Outcasts were fun and if I’m being honest, I’m already regretting moving away from them after seeing some of their Wave 3 model rules (Pigeons!). Anyway, I’ve committed to the Ressers and honestly this is something I need to do. I don’t know the Resser Faction as well as I should, so this is a good chance to learn all their little tricks. ;)

Exchanging all the Outcasts in my Malifaux bag for Ressers was no a small task. After an hour or so of packing I’d crammed 6 Masters into my Bag, plus a handful of Mercs (Nicodem’s the only one I’ve not assembled/painted). That said there are a few more models I’ll want to fit in once painted, specifically some Flesh Constructs for McMourning and Kirai. I’ve also got plans for painting some alternate crews, specifically for McMourning (for the Tale of Malufaux Bloggers) and Molly (which I’ll talk about later!). That’ll probably make it harder to fit 6, or even 5 Masters into my Malifaux bag. Mind you, I’ll be happy if I can take the models for three. It’s just a matter of figuring out which Resser Masters I want to use regularly!

Partway through swapping Outcasts for Ressers in my Malifux bag...

Speaking of which, that’s my first step for the Year of the Crow; deciding which Masters I want to focus on. While I do have some Masters I prefer over others I’m still not decided on three that I both like, and would cover the strategies I’d need to play. Needless to say, and much like my Rainbow Challenge, this is going to require playing each of these Masters at least once again!

Anyway, with my Malifaux ready to go it was onto my first Resser game of the year: A 45SS game against regular opponent Kyle and his Guild-McMourning crew.


The Setup

When we’d originally arranged our game my intention was to go with a Yan Lo crew. On the night however, we flipped for strategies and got this;

Reconnoiter
Line in the Sand
Distract
Power Ritual
Breakthrough
Spring the Trap

Damn, that’s a lot of mobility-based objectives then! Going with a crew that prefers to bunch up a little probably wasn’t going to be the best approach for this game, so Yan Lo was out. I don’t yet have Nicodem, I haven’t worked myself up to trying Tara again and as I mentioned above, I’d quite like to paint some flesh constructs before putting Kirai or McMourning on the table again. So instead, I decided to go with Seamus;

My crew for the day. Just need to base my "Copycat Killer"

Seamus
- Red Chapel Killer
- Bag ‘o’ Tools
- Spare Parts
Sybelle
- Bleeding Tongue
- Not Too Banged Up
Copycat Killer
2x Rotten Belles
2x Crooligans
Hanged

…leaving 1SS for a 4SS cache. Given the schemes I figured Crooligans were a no-brainer with their ability to Distract enemy models and just teleport away. The Rotten Belles were another no-brainer (both in general and for messing opponents models up in Reconnoiter) and Sybelle provided both some melee muscle and support for the Belles. The Hanged is a model I’ve always hated facing, so with a Terrifying-loving crew like Seamus’s, I definitely wanted to give him a go.

As for Seamus, I figured he’d be playing a more independent and evasive game, hence Red Chapel Killer for the easier Back Alley actions and Bag ‘o’ Tools in case he needed to just beat down someone in melee. Spare parts is an upgrade I took the last time I played Seamus and while I didn’t expect to summon another Rogue Necro, the odd Guild Autopsy would certainly help with achieving Reconnoiter.

For my Schemes I went with Breakthrough and Distract. So long as I could keep at least one Crooligan safe I figured Breakthough was a shoe-in, while Distract felt pretty achievable and wasn’t entirely reliant on the Crooligans…although they do (and did) help a lot!

I really should have remembered how much poison McMourning can dole out...

The Game

After revealing crews Kyle said he’d originally planned to go with Sonnia. But like me, he went for another, more mobile Master after seeing the strategy and schemes. His own crew consisted of McMourning, two Nurses, two Witchling Stalkers, a Brutal Effigy, Watcher and Judge. He split his own crew into two groups during deployment. One with McMourning and the Effigy, the other with Judge and the Watcher and both with a Witchling and Nurse each. I assume his plan was for each group to be capable of handling themselves, each with decent killing power and the ability to both disrupt and (with help from the Witchling Stalker’s condition removal) heal models with the Nurse.

I deployed my own crew pretty centrally, with Seamus favouring the McMourning flank and the Hanged closer to Judge’s flank. The Crooligans, of course, sat out of sight on each flank. The one closer to McMourning kept his distance (I remembered how fast he can get) while the other sat behind a hill directly opposite Judge’s group (I was more confident of keeping him safe).

Turn 1 began with the usual positioning. Kyle’s Watcher dropped a scheme marker in the corner (for Power Ritual) and I moved my Crooligan up toward Judge’s team, putting him in cover and on defensive stance in case Kyle tried anything funny. My other Crooligan on McMourning’s side stayed put (too dangerous to poke his head out yet) and rest of Kyle’s crew moved forward. Sybelle moved up and used Call Belle to bring a Rotten Belle up to within Lure range, who then promptly pulled a Witchling Stalker into Back Alley & shooting range of Seamus. The Witchling predictably died (with some help from the Copycat Killer to finish it off), but pushed close enough to my crew to damage a few with Immolating Demise.

The Hanged prepares to extract some revenge on Wp 5 McMourning...

Turn 2 started with a bang! Winning initative, Kyle activated McMourning, moved him up and cast 2x Rancid Transplants and an Expunge to kill Seamus outright (he’d already suffered 5 damage from the Witchling and a wayward shot from the Brutal Effigy). Seamus was dead, but I soon had my revenge! Two casts of Whispers from Beyond by my Hanged stripped 11 wounds off McMourning and prevented further heals. Sybelle and one of two Rotten Belles (teleported in with Call Belle) finished off the remaining three wounds. And with that, we were both suddenly left without a Master for the remainder of the game! The rest of the turn progressed pretty ordinarily by comparison. My Crooligans both tagged a model with Distract and some positioning by the rest of my crew ensured  that neither of us claimed enough quarters for Reconnoiter that turn.

Over the last few turns Kyle attempted to both remove Distract from his own models and place Distract on my Crooligans. Both attempts were sadly foiled by my Luring Rotten Belles (pushing them away and freeing the Crooligans to (2) interact and remove distract). The Brutal Effigy was taken out by a combination of the Copycat Killer’s Flintock and a Lure & Pounce from a Rotten Belle. The Hanged attempted to tie up the Watcher in combat to prevent it placing a scheme marker in my corner (big mistake – Watchers are Stubborn!) but otherwise faced off against the Judge, with neither dealing significant damage to the other. By the start of Turn 5 my crew had cleared McMourning’s flank, leaving Kyle with Judge, the Watcher, a Witchling and Nurse on the other flank. I’d still only lost Seamus so with the numbers well and truly against him I managed to claim another 3 VP for Reconnoiter over turns 3, 4, 5 and 6 (we’d flipped a 10+ for playing an extra turn). Despite the Watcher placing a scheme marker in my board quarter my Crooligan managed to remove the scheme marker in his. The other Crooligan was unopposed, and so had little trouble placing scheme markers for Breakthrough. The game ended decisively in my favour at 10-1, with Kyle picking up one point for Power Ritual and me losing one point from Distract.

The mutually distracted Belle and Nurse flail uselessly against each other. Nursey eventually took a Flintock to the head from the Copycat Killer. ;)

After the Game

In both this and my past games I’ve always found McMourning to be great at both killing things and getting killed. This game was no exception! Losing Seamus to McMourning in the first activation certainly hurt, but between the Sybelle, two Luring Belles and the Hanged I was able to finish him off in response, leaving us both without a Master for the rest of the match. Mind you, I only killed McMourning because the rest of my crew (Crooligans aside) were free to focus their attention on him. If the rest of Kyles crew had been in a position to keep my own models occupied, then it would have been a very different story. And that is probably the secret to getting the best out of McMourning – don’t get him in a position where the opponents crew can focus on him without retaliation.
 Near the end of the game - Sybelle keeps a Witchling engaged while the Crooligan prepares to remove a scheme marker.

Aside from that, I feel like I really underestimated Seamus’s resilience this game. McMourning was well suited to taking him down (especially when I’d left him next to two of his own undead models), but it could have been a similar story had I been facing the likes of Perdita, Lady Justice, possibly even Sonnia. Fact is, half the Guild Masters are very capable of assassinating a low Df Master like Seamus. In retrospect I think Mad Haberdasher would have been a solid choice for Seamus vs Guild.

Spare Parts was a wasted upgrade, and not just because Seamus didn’t live long enough to use it. Between the Red Chapel Killer upgrade and his existing summoning spell, Seamus had more than enough uses for the corpses he’d generate. What he needed instead, as per above, was some more resilience with Mad Haberdasher. So while Corpses can be a powerful resource in Resser crews, they’re also quite finite. So in the future I’ll need to think more carefully about whether I’ll have enough corpses available for the upgrades/models I take.

Who's a pretty girl?

Sybelle is one of those models I never thought much of (partly due to a past edition bias), but in my games against her recently I’ve come to see just how good she is. For her cost she’s decently resilient, a significant threat in melee (esp with her Bleeding Tongue upgrade) and nothing short of excellent at supporting her Belles (esp. with Not too Banged Up). In this game I got value out of every aspect of her. Her shining moment in the game was probably helping to kill McMourning, both by dealing some damage and by teleporting a Rotten Belle into position to finish him off. In fact Call Belle proved to be an invaluable spell. Pulling a Belle up on the first turn helped me Lure in a Witchling Stalker to get killed. And then later on she teleported one to the other side of the board to both Lure an enemy model off my Crooligan (freeing it to remove Kyle’s scheme marker for Power Ritual) and helping me achieve Reconnoiter. All in all, I think she’s going to be a difficult henchman to pass up if I’m taking more than one Rotten Belle.

Rotten Belles were just plain good, as they’ve always been in the games I’ve played with/against them. The high Ca, 18” Lure has so much potential for isolating models, positioning your own model and denying schemes. Plus that Undress action for Slow on enemy models certainly had its uses. Nobody like getting Slowed. ;)

Always loved this sculpt. Stay classy Seamus! 

I never expected too much from the Copycat Killer. After all, he’s a cheap peon so he wasn’t going to contribute to the strategy/schemes. At best I expected him to finish off other minions in support of Seamus. Losing Seamus pretty much nixed the Copycat Killer’s mobility but even so, he still managed to help kill a Witchling Stalker, Brutal Effigy and a Nurse (the latter being engaged with my Rotten Belle at the time) – not a bad tally for a 3SS peon! I suppose the alternative to having my Copycat Killer was to either grab a Grave Spirit or third Crooligan, or to upgrade one of my existing models to something more costly (Belle to Dead Doxy, or Sybelle/Hanged to Valedictorian). None of those options seem worthwhile given what the Copycat killer was able to achieve though, so I’m happy with his inclusion.

There’s a lot I like about Crooligans. On the table they’re the objective grabbers I crave in most of my games and the fact that they’re undead children is hugely appealing to me. The competition for this slot in my Resser crews will undoubtedly be the Necropunks. I prefer the former, even if only because I like the models more! But while the Necropunk’s leap requires a decent card to cheat, I feel he’s still the better option in a game without Distract or Cursed Object as a scheme.

Finally, there’s the Hanged. This was actually my first game ever with them on my side, and he didn’t disappoint. Whispers from Beyond was instrumental in killing McMourning after he’d taken on Seamus, effectively dealing 11 Wounds from two casts and preventing any chance of McMourning healing himself. That alone made him well worth the investment, although it would have been nice to see him utilise his other talents a little more, specifically Unrelenting Terror and his many Horror Duel triggers to both strip my opponents hand and paralyse enemy models wholesale. Still, if this game proved anything, it’s that the Hanged is a threat both at range and (I assume) up close!

The Seamus crew I used last year - why the hell didn't I take Sybelle?!

Final Thoughts


So that’s it – my first Resser game of the year. I’m not sure if I can say much about how I found Seamus given how long he lasted. Although I at least know from past experience that I enjoy playing him. The game also gave me a nice feel for how a Resser crew works in a more general (ie. Masterless!) sense, so there is that I suppose. Still, hopefully my Master won’t die quite so fast in future games!
Monday, 26 January 2015

ToMB 2015: Month 0

I remember the origin of the “Tale of” initiatives. It all started more than a decade ago in Games Workshop’s White Dwarf (back when it felt less like a catalogue), when a bunch of the GW staff decided to get together and start a series of articles called the “Tale of 4 Gamers”. Every player began with a certain amount of money to start their armies with, and they’d get an allowance each month to with which to expand their collection. In each issue, the gamers would describe their experience and exploits in building, painting and playing with their growing armies. The format was a massive hit. Not only did GW follow it up at least once more with a “Tale of 40k Gamers” series, but it was copied by gaming groups and on forums everywhere. The fact that it's still regularly done by players speaks volumes as to the concepts longevity and appeal. 

Anyway, the short version of this is that I’ve ALWAYS wanted to do a proper “Tale of” challenge. Unfortunately I was unable to take part in last year’s Tale of Malifaux Bloggers, due to having already committed to my Rainbow Challenge. This year however, all I’ve committed to is playing Ressers, so I’m free to give it a crack!


Rules, Rules, Rules.
So first thing’s first, the rules. If you’re not yet familiar with them, here’s a link to Psientologist’s blog;


The challenge is due to start proper at the beginning of February, but in the meantime I need to come up with a Master to commit to. As per above I’ve already decided on Ressers for this year so it will have to be someone from that Faction. But which one?

The tricky thing about doing Ressers for this challenge is that half of them are dedicated, drown-them-in-bodies summoners. Building a functional crew for such a Master is very tough when you can only spend so much per month. So despite having his crew available and unassembled, Nicodem is right out. Same goes for Molly (who lacks a plastic starter) and Kirai (who's $50 box has just 14SS worth of models). So what about the rest?


Seamus
Despite his ability to bring out Rotten Belles, summoning is not a major part of how Seamus plays. So the basic boxed set plus some hanged would probably serve me well as a functional staring point for my crew. The only negative is that I already have a Seamus crew (the Rainbow Challenge is coming back to haunt me!) and unfortunately, I like my “Evil Dead” Seamus much more than the current plastic version. That said, if I can find a suitably awesome/ridiculous proxy for Seamus then it might be enough to sway me toward him.


McMourning
While he’s not as demanding a summoner as the “big three”, McMourning is nevertheless quite capable of pumping out Flesh Constructs and Canine Remains to do his bidding. While I did give him a go last year I used him as a Guild Master, so I never got to try his summoning side. That said I *think* I can buy enough of his summons within the allotted budget to make a decent crew (side note: how many flesh constructs does he really need?), so he remains a possible option.  

Like Seamus I have a painted crew for McMourning. But while I’m fond of “Teatime McMourning” he’s never quite sat right with me. It’s probably just the green bases (something I can easily fix), but nevertheless it’s enough for me to not be fussed about painting a fresh crew for him. Again, I’d need a theme to go with it though, and it’d probably need to at least compare with Teatime McMourning…


Tara
Tara is effectively a non-summoner (especially if you don’t take Karina, her totem), but she also has no models available outside her Nightmare Edition Box so I’d probably have to proxy everything. That said, from what I hear, Tara doesn’t need her Void models or even her Totem to work in a Resser crew. So as long as I find a proxy for Tara herself, building the rest of her crew could prove pretty simple.

The negative for Tara is that she’s the Resser Master that I’m second least excited about using (after Nicodem). So if my suspicions prove true and I don’t enjoy playing her, I’m going to lose the motivation to finish this challenge pretty fast .


Yan Lo
I’ve said before that I was never all that happy with my Yan Lo crew. It wasn’t pink enough and the models themselves are just a nightmare to try and fit into my carry case. Given that his summoning focuses on replacing losses rather than boosting numbers Yan Lo should be pretty easy to build for this challenge. His starter is cheap and after you've got his ancestors, you only need a few more bits and pieces to round him out. The only problem is that there’s no way in hell I’m buying his boxed set again. So I’d need suitable proxies for his entire crew.


THE DECISION
I have to admit, I’d already decided on a Master before writing this article. But even so, putting cases forward for the other Masters did make me rethink whether it was the best decision. In the end though, it wasn’t enough to sway me and I’m satisfied I've made the right choice.

I’ve decided to go with the good Doctor, Douglas McMourning, BSc, MD, PhD.

Like I said before, I was never entirely satisfied with Teatime McMourning, so building a new crew will give me a nice, more Resser focused McMourning to play around with. Getting enough Flesh constructs might prove a challenge, but I’m not convinced it’s impossible. But most importantly, I’ve come up with a crew theme that I believe will keep me interested for the duration of the challenge!

So what will be my first purchase for my Resurrectionist Master McMourning, whom I’ll be playing as a Resurrectionist?


Huh…

Saturday, 24 January 2015

Rathnard's Gencon Guide

So this was something I wrote up a few months back, but was probably too long, too off topic and dare I say it, too self indulgent for the Wyrd Chronicles. ;) So instead, with Gencon 2015 tickets having just been made available, I thought I'd post this up on my blog. 


Tip #1: Make sure your camera is half decent. :P

As you should surely know (what, you mean you don’t closely follow my wacky adventures?!) 2014 was the year I attended Gencon, the self-described Best Four Days in Gaming(TM) and arguably one of the biggest gaming conventions on Earth! Being both married with a daughter and from literally the other side of the world, this was a big trip for me. Fortunately I can say that despite the cost, flight time and effort involved it was a truly unforgettable experience, and one I’d highly recommend it to any gamer out there!

In light of this, I thought I’d take this opportunity to write a guide for those people who are planning to attend future Gencons! This is by no means a comprehensive guide. After all, I’ve only attended once and I’m trying to avoid writing a novel-sized article! So instead, I’m focussing on the tips I learnt and found most useful as a first-time attendee, and in particular as someone who was mostly (but not entirely) interested in Wyrd-related gaming.


Outside the Exhibition hall, about 15 mins before opening on the first day. 

Booking your Badge

It should go without saying that your first stop when planning a trip to Gencon is to access the website: http://www.gencon.com/. There’s a lot of handy info on the convention itself and I’d strongly recommend you give it a browse while you’re planning your trip. Aside from the date of the convention, the most immediately useful bits of information are the dates for when Badge and Event Registration open. The Badge is your ticket to the convention itself and as far as I know, there’s no limit to how many are sold.  There’s also the option for a VIG (“Very Important Gamer”) Badge. This offers early access to the Exhibition hall and various other perks, but it’s quite expensive (more than US$500) and very limited in number so they sell out fast. I was too slow to buy a VIG when I booked my badge but with hindsight, I don’t regret not getting one. The perks would have been nice but I never felt as though I wasn’t getting the full “Gencon Experience” without a VIG badge. Whether it’s worth the price is up to you but if you do want one, make sure you buy it the moment badge registration opens (EDIT: if you're reading this now for Gencon 2015, you're probably too late for a VIG badge).


Despite the excellent location, these apartments were unavailable due to building code violations. 

Accomodation!

First and foremost, I cannot stress enough just how important it is to book a hotel close to the convention centre! Yes, it’s going to cost a small fortune but believe me when I say that it’s absolutely worth it! For one, part of the expense is negated by not having to pay for transport to and from the Convention Centre every day. Also with the crowds and excessive walking, you really don’t want to be carrying more than you have to around the convention centre. So having a hotel nearby to drop off shopping or pick up your gear will prove invaluble, especially if you do what I did and buy more than US$1000 worth of models and other stuff for friends!

Gencon does offers discounted hotel rates through their reserved housing block, which becomes available for booking online about one week after the Badges go on sale. Unfortunately, the online system for booking these rooms should actually, seriously be considered a form of torture! Getting decent accommodation requires you to be online with a few thousand other people as soon as the website opens. And unfortunately, severely overloaded websites rarely work as quickly or reliably as you want them too.

For me, I was up at 3am (Perth time) in the hopes of getting a good room when the reservations website opened. The first attempt got me a reservation at the Hilton, right near the convention centre…but the website kicked me out as I was filling in credit card details. It took another two attempts and at least an hour of waiting before I finally managed to get a hotel next to the airport. It was a reasonable rate, but was a long way from the city and the whole experience left me bitterly disappointed about what I ended up with. In the end I gave up on the Gencon booking system and instead went through the usual channels (eg. TripAdvisor.com or the hotel websites themselves) to book a non-discounted (and expensive!) hotel in downtown Indianapolis.
                                                                                                                        
Speaking of costly accommodation, I found that sharing the room with two other friends made that hugely expensive hotel room much more affordable. Most standard hotel rooms will come with two beds, but someone could always bring an inflatable mattress or (if they feel like roughing it) just sleep on the floor. Some hotels will also be happy to wheel in a cot for that third person to sleep (for a nominal fee, of course!). Check with the hotel to see whether they can do that and if you do need a cot, try and arrange it as soon as possible in case they run out (and they probably will!). Depending on the room size you might be able to fit in a fourth (especially if they’re sharing a bed with someone else), but it will definitely be getting quite cramped by that point.


Look mum, I'm playing Malifaux!

Events!

After buying your badge and booking a room, the next thing you’ll need to do is register for any events you want to participate in at Gencon. This includes tournaments, demo games, contests and generally participating in anything that’s organised and run by another company or group. Most of these take place in the Events hall, a huge space that is open almost 24 hours a day. Event registration typically opens a few months before Gencon, but the list of available events (with times and costs) is made available about a week before registration opens. This gives you some time to plan out your wish list of what you want to attend and when, before registration finally opens and the rush begins to actually secure those tickets. Fortunately, event registration isn’t nearly as painful as booking a hotel. At least in my own experience, most events won’t sell out the moment registration opens. So unless you know the event in question is wildly popular (eg. True Dungeon), you will usually be able to get what you’re hoping for.

One of the big questions about events is how many you should book for your time at Gencon? It is very easy to fill out your entire schedule, but doing so means you’ll either lose your spot at one event if another runs too late, or you won’t have enough time to wander the convention centre and check out all the cool new games, activities and other products on display. I found that a nice balance was to leave at least one full day to wander the convention centre. Personally I gave myself about 1 ½ days, which I felt was about right for me. It also helps to remember that while the Events hall is open almost 24 hours a day, the Exhibition hall (where all the games companies and other vendors sell their wares) is only open from 10am-6pm (4pm on Sunday). So booking events outside those hours will not interfere with any potential shopping or browsing time (I make no promises about socialising or sleeping time though!).

SPEEED PAINTIIIIING!!!! Well worth doing, especially since you get a free mini out of it!

While getting your event tickets, I would also recommend buying a few generic tickets. These can be used to fill in an empty spot at an event you hadn’t booked for or even for an event you that had booked out before you bought your tickets online. Unused tickets can be refunded for “system credit” (which only allows them to be spent on tickets/registration at a future Gencon), so you’ll want to weigh up how much you’re prepared to spend on tickets that you may not use, especially if like me, this may be your only foreseeable Gencon! Personally, I only spent one generic ticket (for a speed painting contest), but if my interests had been broader or I’d researched what I could have attended a little better, I'm sure would have used more.

Unless your tickets are mailed to you before Gencon, you’ll need to pick them up from the Will-Call booth at the convention centre itself. The staff are excellent at keeping the line moving quickly, but I’d still suggest picking up your tickets the day before Gencon officially opens. You can still grab them during the convention but if you do, try and avoid the morning of the first day when the queue is largest by far.

While you’re visiting the Will-Call booth, make sure you pick up a Program Book too, for the hefty cost of $0! The convention centre map itself is well worth having, but flipping through it can give you lots of great ideas on what to do in your downtime. This includes themed restaurants, promotions, giveaways and of course events that you might have missed when doing your research online!


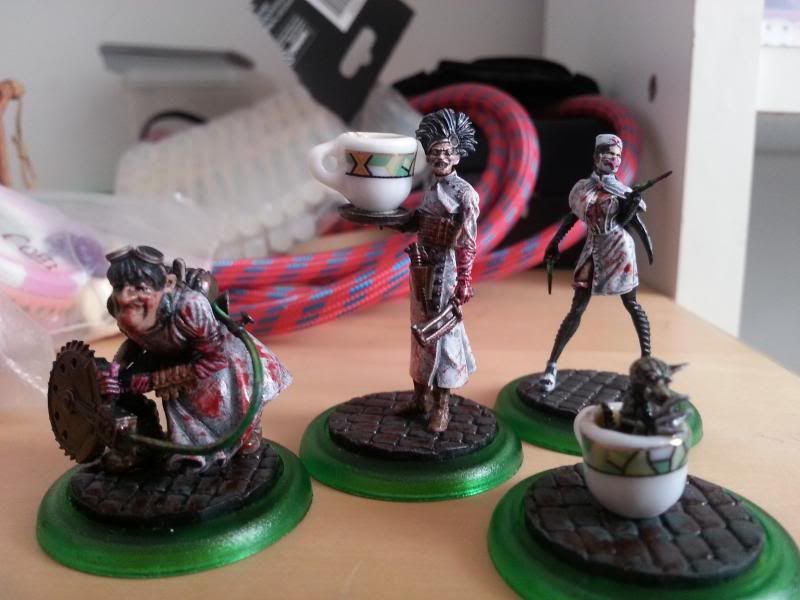
The Haul.

Shopping!

With so many companies at the one event releasing everything from exclusives to newly released products, it’s inevitable that you’ll be doing some shopping over Gencon. The question, then, is when to do it? The morning of the first day is undoubtedly the busiest time at the Exhibit Hall, but if you want to get some exclusive or early releases before they run out, this is sometimes your only chance to buy them.

If you really do want to do your shopping on the first day, it really helps to have a plan of attack. For me, I wanted to buy some “essentials” from the Wyrd booth as soon as the doors opened. So I used the Exhibit Hall map to determine exactly where the booth was located and positioned myself outside the doors half an hour before they opened. There was still more than a hundred people in front of me but this turned out not to be a problem. Once the doors opened I made a beeline for the Wyrd booth and was still one of the first people there. In fact grabbing what I needed, heading to the cash register and paying took all of about two minutes, giving me time to head for another booth to buy the next item on my shopping list. Needless to say, I found this approach was well worth it, especially considering a friend who arrived a little later at the Wyrd booth had to wait a full hour in line to buy his product!

Peak hour at the Wyrd booth. Save yourself the stress and stay away until the crowds clear. 

Speaking about Wyrd in particular, in recent years the company has been very good at bringing enough stock to satisfy the customers over the course of Gencon. But there’s always a few items that run out by the end of the convention (rarely by the end of the first day, though). You might be able to predict some of them, (like the Strategies and Schemes deck last year), but others may take you by surprise (like Killjoy, believe it or not). If you’re concerned that something you want will run out, then it’s worth getting in early to buy those items as soon as possible. Otherwise, consider ordering online on the morning of the first day for those particular releases. Stock also occasionally arrives partway through Gencon, so if there’s something specific that’s not available on the first day (this will always be announced through the Wyrd website), it might be best to avoid the initial crowds and do all your purchasing once everything you want is available.

If you are planning to spend a lot of money at the Wyrd booth, try and find a chance to chat with one of the staff to let them know in advance. Then do your purchasing during a quiet time at the booth, such as the afternoon. If the booth is empty and you’re nice enough to the staff (and I really must stress this – be NICE to the staff!), they might even help you collect your order and bring it to the cash register.

In past years Wyrd has offered a free limited edition model for orders over $100. If you’re hoping to get more than one of these then in the past it's been possible to do so at the Wyrd booth, but you’ll have to divide your order into multiple $100 lots, paying for each lot separately (there's no guarantee they'll do this again in 2015 mind you). Ideally you’re best off doing this during the quiet periods (see above) where both you and the staff aren’t in a rush to process your order. However if you absolutely must do this when it’s busy then don’t mess about – make sure you’ve already divided your order up so that you waste as little time as possible at the till!

Have cash on hand. While almost every booth will accept your credit or debit card, sometimes the card readers will be down. In such cases cash is the only option unless you’re willing to wait around for the machine to work again! During the peak times I found that some booths will divide their customers into two separate lines – those with cash and those with a card. The cash line tends to go much faster than the card line, so you can save yourself some time by being flexible in how you can pay for your goodies!
                                                                                                                   
If you’re not from the USA it’s worth knowing that in most States, retailers (including those at Gencon) will charge you an additional sales tax on top of the advertised price of whatever you buy. In Indiana this sales tax amounts to 7%. So if you’re doing any shopping at Gencon, make sure you take into account that extra cost when working out how much money to bring on the day.  

If you’re after a bargain, it will pay to do your shopping on the last day of the convention. Many (not all!) vendors will be selling their wares at a discount to minimise how much they have to take home with them. So taking the time to wander the Exhibit hall in the closing hours of the final day might just land you some cheap, last minute goodies.

My final shopping related tip is something that never even occurred to me until I was in actually on my flight to Indianapolis. If you’re not from the USA, make sure to look up your own country’s import allowances! Most countries allow people to bring in purchased goods to a certain value, above which they hit you with an import tax. The last thing you want is to get hit with a few hundred dollars in tax so if you are planning to buy a lot, make sure you’re not going to exceed your countries limit. In my case, the amount I bought at Gencon was well in excess of AU$900 (the limit on imports for Australia), so I circumvented this by sending some of my purchased models home through the post. It cost me a fair amount to do so, but it was better than possibly being delayed at the airport and forking out a few hundred dollars extra in tax.

The whiskey was all gone by the time I arrived, so you'll need to bring your own. 

And finally…

Make sure you bring food and water. While there is no shortage of nearby restaurants and food trucks nearby the venue, there’s also no shortage of people queuing for those food trucks over lunch. Not to mention that you may not want to waste the time and money getting out there to find sustenance, especially if you’re in the middle of an event. So be sure to pack a bottle of water and a few bananas or energy bars. It’s well worth the trouble, and it may even win you a few friends if you encounter a game designer who hasn’t eaten all day because he or she couldn’t leave the exhibition hall (looking at you, Aaron Darland!).

Finally, to round this guide out I have one more nugget of wisdom. Remember those poor saps not attending Gencon? Remember how you used to feel, waiting on the edge of your seat to get any new info on the releases as all those lucky schmucks got their books, cards and models weeks before you did? And remember how awesome it was when some of those schmucks took the time to post pictures of all those cool products during Gencon? I hope you know what I’m getting at here. Please, for the sake of the rest of us, bring a camera and upload photos during the convention. :)

Until next time,


Adrian